Namespaces 03 - UTS namespace
Linux Namespaces Learning · Previous: MNT namespace · Next: PID namespace
The Slovak original of this document: Namespaces 03 - UTS namespace (slovensky).
UTS (UNIX time-sharing system) namespaces in Linux
1 Introduction
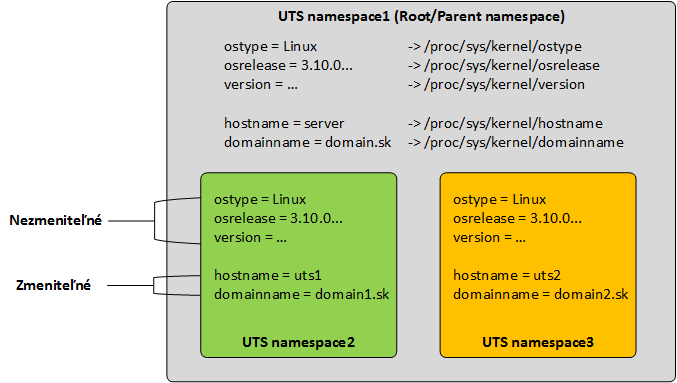
The UTS namespace (UNIX time-sharing system) isolates two system identifiers: the node name (host name) and the domain name, both returned by the "uname()" system call.
2 Working with UTS namespaces
2.1 Checking the host name in the default namespace
In terminal 1 (TERM1), check the host name.
TERM1# uname -n
----------------------------------------------------------------------------------------------------------------
server1.domena.sk
2.2 Creating a new UTS namespace
In terminal 2 (TERM2), create a new UTS namespace.
[1]TERM2# unshare -u /bin/bash
[2]TERM2# echo $$
----------------------------------------------------------------------------------------------------------------
6012
[3]TERM2# hostname uts1.domena.sk
[4]TERM2# uname -n
----------------------------------------------------------------------------------------------------------------
uts1.domena.sk
- [1] - Create a UTS namespace (-u) and run the BASH shell in it.
- [2] - Find the PID of the BASH process.
- [3] - In the new UTS namespace, change the host name to "uts1.domena.sk".
- [4] - In the new UTS namespace, check the host name.
2.3 Checking that the new UTS namespace exists
In terminal 1 (TERM1), check that the new UTS namespace exists with "namespaces-info.sh", printing only the non-default namespaces (the -n switch).
TERM1# ./namespaces-info.sh -n
----------------------------------------------------------------------------------------------------------------
---------- + ---------- + -------------------- + ----------------------------------------
PID        | PPID       | NAMESPACE            | COMMAND
---------- + ---------- + -------------------- + ----------------------------------------
18         | 2          | mnt:[4026531856]     | [kdevtmpfs]
---------- + ---------- + -------------------- + ----------------------------------------
585        | 1          | mnt:[4026532423]     | /usr/lib/systemd/systemd-udevd
---------- + ---------- + -------------------- + ----------------------------------------
720        | 1          | mnt:[4026532450]     | /usr/bin/vmtoolsd
---------- + ---------- + -------------------- + ----------------------------------------
755        | 1          | mnt:[4026532451]     | /usr/sbin/NetworkManager
---------- + ---------- + -------------------- + ----------------------------------------
854        | 755        | mnt:[4026532451]     | /sbin/dhclient
---------- + ---------- + -------------------- + ----------------------------------------
6012       | 5995       | uts:[4026532424]     | /bin/bash
---------- + ---------- + -------------------- + ----------------------------------------
Current practice (checked 2026-10)
noteThe article above is kept as it was written in 2016. This section lists what has changed since and what to do instead today.
- Still correct:
unshare -u /bin/bashas root works as shown. The steps below are what is done differently today. - Root is not needed: together with a user namespace an ordinary user can do the same. The host name set inside does not change the host name of the system.
- Checking the namespace:
lsns -t utsfrom util-linux lists all UTS namespaces with the PID and command of a process in each;lsns -t uts -p 6012shows the one of a given process. It replacesnamespaces-info.sh -n. - Joining it from another terminal: as root,
nsenter -t 6012 -uenters the UTS namespace of that process. For a namespace created inside a user namespace as above, the owner enters withnsenter -t PID -U -u --preserve-credentials uname -n. - Keeping it without a process:
unshare --uts=FILEbind-mounts the namespace on a file, andnsenter --uts=FILEenters it later;umount FILEdestroys it. The unshare man page shows this with/root/uts-ns.
The unprivileged variant of section 2.2 (the second command shows that the host keeps its name):
$ unshare --user --map-root-user --uts sh -c 'hostname uts1.domena.sk; uname -n'
$ uname -n
Sources: