Namespaces 12 - USER namespace
Linux Namespaces Learning · Previous: IPC namespace · Next: CGROUP namespace
USER (user and group IDs) namespaces in Linux
1 Introduction
The USER namespace isolates user (UID) and group (GID) identifiers. A process has one set of IDs inside the namespace and another set outside it, and a table kept by the kernel translates between the two. It is the only namespace that an ordinary user may create without any privilege, and that makes it the one every other unprivileged namespace is built on. This article follows the line of the LinuxDays 2026 talk by Michal Vyskočil on modern process isolation (see Sources); the examples were run as an ordinary user with UID 1000 on a 6.12 kernel with util-linux 2.40.
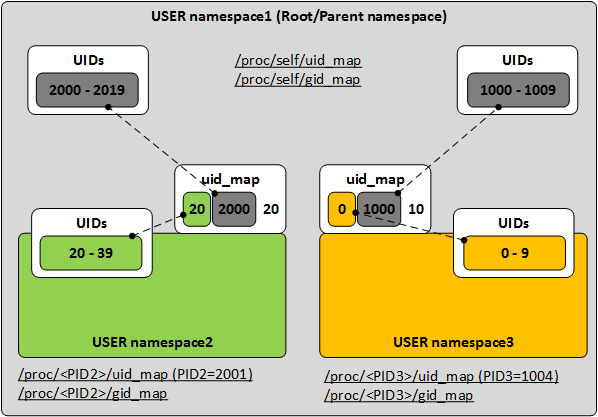
The translation table of a process is the file /proc/PID/uid_map (and /proc/PID/gid_map for groups). Each line has three numbers: the first ID inside the namespace, the first ID in the parent namespace, and how many IDs follow. In the picture, USER namespace2 has the line 20 2000 20: the UIDs 20 to 39 inside are the UIDs 2000 to 2019 of the parent. USER namespace3 has 0 1000 10: the UIDs 0 to 9 inside, root among them, are the UIDs 1000 to 1009 of the parent. The IDs inside are not new IDs. They are IDs of the parent namespace under another number, and for every file and every signal the kernel checks the number as the parent sees it.
2 Working with USER namespaces
2.1 Who you are outside and inside
Outside, you are an ordinary user. The symbolic link /proc/self/ns/user names the user namespace you are in.
$ id
$ uid=1000(user) gid=1000(user) groups=1000(user),10(wheel)
$ readlink /proc/self/ns/user
$ user:[4026531837]
unshare --user runs a command in a new user namespace. No sudo is involved. The namespace is a different one, and inside it you are somebody else.
$ unshare --user readlink /proc/self/ns/user
$ user:[4026534203]
$ unshare --user id
$ uid=65534(nobody) gid=65534(nobody) groups=65534(nobody)
2.2 Without a map everything is nobody
The new namespace starts with an empty map. An ID that has no line in the map is shown as the overflow ID, 65534, which /etc/passwd calls nobody. That holds for your own process, for your own files and for the files of the real root.
$ unshare --user cat /proc/self/uid_map
$ cat /proc/sys/kernel/overflowuid
$ 65534
$ touch f
$ ls -ln f
$ -rw-r--r-- 1 1000 1000 0 Oct  4 20:46 f
$ unshare --user ls -ln f
$ -rw-r--r-- 1 65534 65534 0 Oct  4 20:46 f
$ unshare --user ls -ld /etc
$ drwxr-xr-x. 162 nobody nobody 12288 Oct  4 09:41 /etc
The first command prints nothing: the map is empty.
2.3 Mapping yourself to root
An unprivileged process may write exactly one line into its map: its own UID, under any number it likes. unshare --map-root-user writes that line with the number 0, and the same for the group.
$ unshare --user --map-root-user id
$ uid=0(root) gid=0(root) groups=0(root),65534(nobody)
$ unshare --user --map-root-user cat /proc/self/uid_map /proc/self/gid_map
$          0       1000          1
$          0       1000          1
$ unshare --user --map-root-user ls -ln f
$ -rw-r--r-- 1 0 0 0 Oct  4 20:46 f
Read the map line as in the picture: UID 0 inside is UID 1000 outside, and the range is one ID long. Your file now appears to belong to root, because inside the namespace you are root. From outside nothing has changed. A process started this way is still listed under your name, and its map can be read from outside.
$ unshare --user --map-root-user sleep 3 &
$ ps -o pid,user,comm -p 1211270
$     PID USER     COMMAND
$ 1211270 user     sleep
$ cat /proc/1211270/uid_map
$          0       1000          1
$ lsns -t user -p 1211270
$         NS TYPE  NPROCS     PID USER COMMAND
$ 4026534201 user       1 1211270 user sleep 3
2.4 Capabilities inside, and why they give no power over host files
A process that enters a new user namespace gets the full set of capabilities there. Outside you have none. Without a map, unshare then executes your command as nobody, and a process that is not UID 0 loses its capabilities when it executes a program. Mapped to UID 0, it keeps the complete set.
$ grep CapEff /proc/self/status
$ CapEff:	0000000000000000
$ unshare --user grep CapEff /proc/self/status
$ CapEff:	0000000000000000
$ unshare --user --map-root-user grep CapEff /proc/self/status
$ CapEff:	000001ffffffffff
These capabilities are valid only for things that the namespace owns. The files of the host belong to the real UID 0, and that UID is not in your map, so the root inside is refused like any ordinary user.
$ unshare --user --map-root-user touch /etc/remove-me
$ touch: cannot touch '/etc/remove-me': Permission denied
$ unshare --user --map-root-user cat /etc/shadow
$ cat: /etc/shadow: Permission denied
The same rule applies to the other namespaces. The host name belongs to the UTS namespace of the host, which the initial user namespace owns, so your capabilities do not reach it. Create a UTS namespace of your own inside the user namespace and the same call works, because that one is yours.
$ unshare --user --map-root-user hostname test
$ hostname: you must be root to change the host name
$ unshare --user --map-root-user --uts sh -c "hostname test; hostname"
$ test
2.5 One UID or a range
With one mapped ID there is only one owner you can give a file to. Any other number has no meaning inside the namespace, and the kernel rejects it.
$ unshare --user --map-root-user chown 1 f
$ chown: changing ownership of 'f': Invalid argument
A map with a whole range, like the ones in the picture, cannot be written by an unprivileged process itself. The administrator of the machine lends each user a range of subordinate IDs in /etc/subuid and /etc/subgid, and the helpers newuidmap and newgidmap, which carry the needed capability, write a map that uses this range after checking those files.
$ grep "^$(id -un):" /etc/subuid /etc/subgid
$ /etc/subuid:user:524288:65536
$ /etc/subgid:user:524288:65536
$ getcap /usr/bin/newuidmap /usr/bin/newgidmap
$ /usr/bin/newuidmap cap_setuid=ep
$ /usr/bin/newgidmap cap_setgid=ep
Rootless podman sets up such a namespace for its containers. podman unshare runs a command in it, which makes it a convenient way to look at a two-line map: your own UID as root, and the borrowed range after it.
$ podman unshare cat /proc/self/uid_map
$          0       1000          1
$          1     524288      65536
Now there is a UID 1 inside, and a file can be given to it. Seen from the host, that file belongs to the first ID of your borrowed range.
$ podman unshare sh -c "touch g; chown 1:1 g; ls -ln g"
$ -rw-r--r-- 1 1 1 0 Oct  4 20:46 g
$ ls -ln g
$ -rw-r--r-- 1 524288 524288 0 Oct  4 20:46 g
2.6 The user namespace as the key to the others
Every other namespace needs the capability CAP_SYS_ADMIN to be created, so an ordinary user cannot create them directly.
$ unshare --pid --fork --mount-proc ps ax
$ unshare: unshare failed: Operation not permitted
$ unshare --net ip -br link
$ unshare: unshare failed: Operation not permitted
Put a user namespace in front and the same commands work, because the capability is now checked in a user namespace where you hold it. A PID namespace with its own process numbering:
$ unshare --user --map-root-user --pid --fork --mount-proc ps ax
$     PID TTY      STAT   TIME COMMAND
$       1 ?        R      0:00 ps ax
A network namespace, which starts with a loopback interface that is down and nothing else:
$ unshare --user --map-root-user --net ip -br link
$ lo               DOWN           00:00:00:00:00:00 <LOOPBACK>
A mount namespace, in which you may mount a tmpfs that the host never sees (the second command runs on the host and prints nothing):
$ unshare --user --map-root-user --mount sh -c "mount -t tmpfs none /mnt && findmnt -n /mnt"
$ /mnt none tmpfs rw,relatime,uid=1000,gid=1000,inode64
$ findmnt -n /mnt
This is how rootless containers and unprivileged sandbox tools start: a user namespace first, then the PID, mount, network and UTS namespaces inside it. The last article of this Learning, From namespaces to a sandbox, builds on that.
3 Check yourself
Answer these before you look at the answers:
- You run
unshare --user idand seenobody. Has your process lost its identity on the host? No. The host still sees UID 1000; the namenobodyonly says that the new namespace has no map line for that UID yet. /proc/self/uid_mapshows0 1000 1. Which UID does the host see when this process creates a file? UID 1000. UID 0 inside is UID 1000 outside, and the kernel stores and checks the outside number.- The process has
CapEff: 000001ffffffffffand is UID 0. Why can it not write to/etc? The capabilities count only for resources owned by its own user namespace./etcbelongs to the host's UID 0, which is not in the map. - Why does
chown 1 ffail under--map-root-userand work underpodman unshare? The first map contains one ID only, so UID 1 does not exist inside. The second map adds the range from/etc/subuid, written bynewuidmap.
Sources: